We know, we know. Its the end of summer. But hey, look at your feet! Are you wearing flip flops? Of course you are. It’s only September. Why on earth would you be wearing anything else? We love flip flops so much we named our blog after them (clearly, we also love freedom). We’ve all seen the Pinterest boards with DIY flip flops, and we said to ourselves, “Hey! They’re not better than us!” So we took a trip to the craft store (obvi) and Old Navy ($2 flip flops!!!) to see if that was just crafting hubris.

Craft stores love me.
Something I would recommend is planning out your flippy floppies beforehand. It IS a lot of fun to run in and grab everything you see that would be pretty to hot glue onto a flip flop, but when you walk out of the store $75 later you may have some buyers’ remorse. KIDDING! Who would get buyers’ remorse at a craft store? That’s like saying you can get buyers’ remorse from Michael Kors. IT. JUST. DOESN’T. HAPPEN. However, if you are one of the few that is plagued by this increasingly prevalent infliction (thanks US economy!), I would recommend going in with a plan.
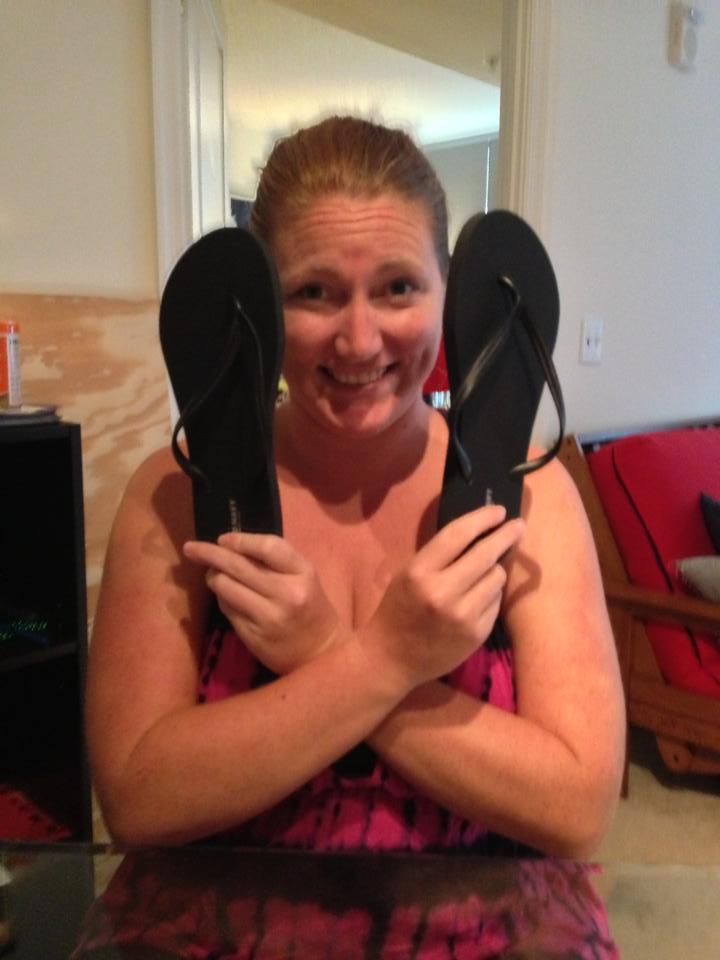
Let’s start off with a simple pair of flip flops. I made these for Big Sug. He is a big football fan. Can you guess his team? The ribbon wrapped flip flops are by far the easiest.
First, hot glue or stitch the ribbon to itself at the base of the thong. It has a better chance at survival if you wrap it and glue it to itself than wrapping and gluing to the plastic. Especially since it’s plastic. And the glue is hot. Hot plastic is NOT what’s up.
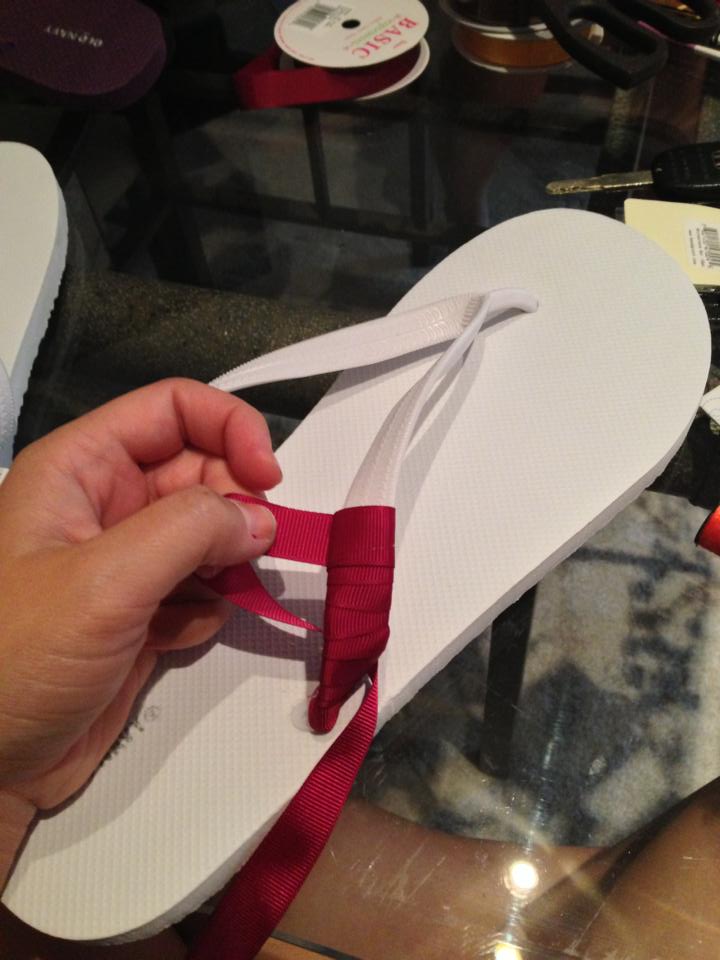
My feet are big…but these are definitely for Big Sug.
Hot glue as you go! Hot glue is the greatest invention in the history of ever. I hot glued his flip flops about every other time I wrapped them. Just put a little dab of glue on the fabric and wrap the fabric around the glue.
Is your hot glue gun your bff, too? Don’t tell Whit!
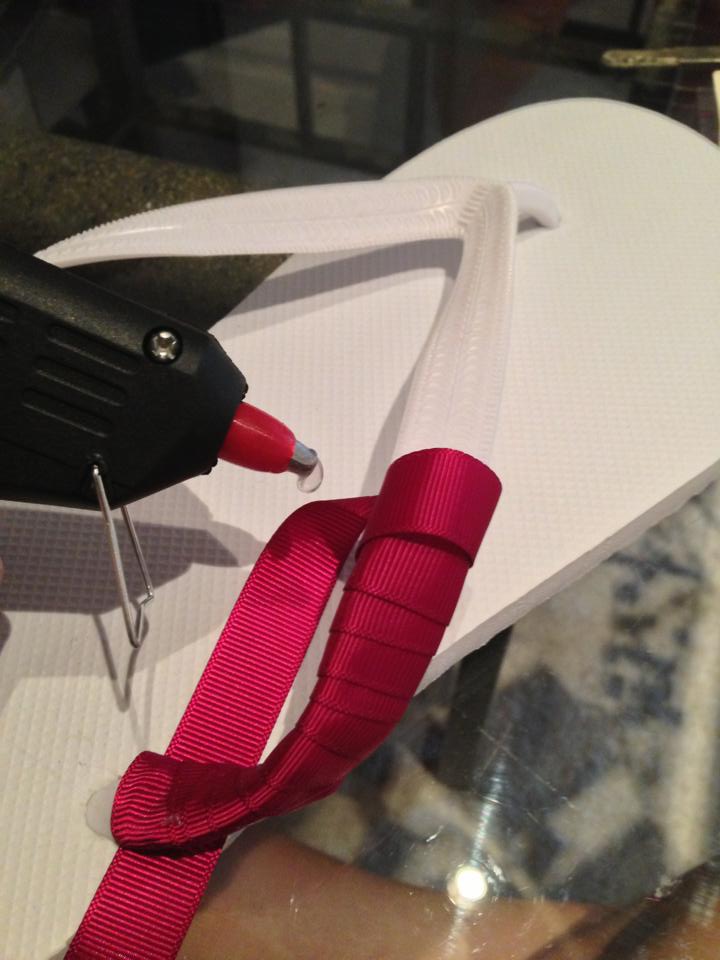
When you get to the tip of the thong, trim the ribbon and hot glue the end piece on the underside. This way you don’t have a big frayed piece sticking out. I recommend wrapping each side separately.
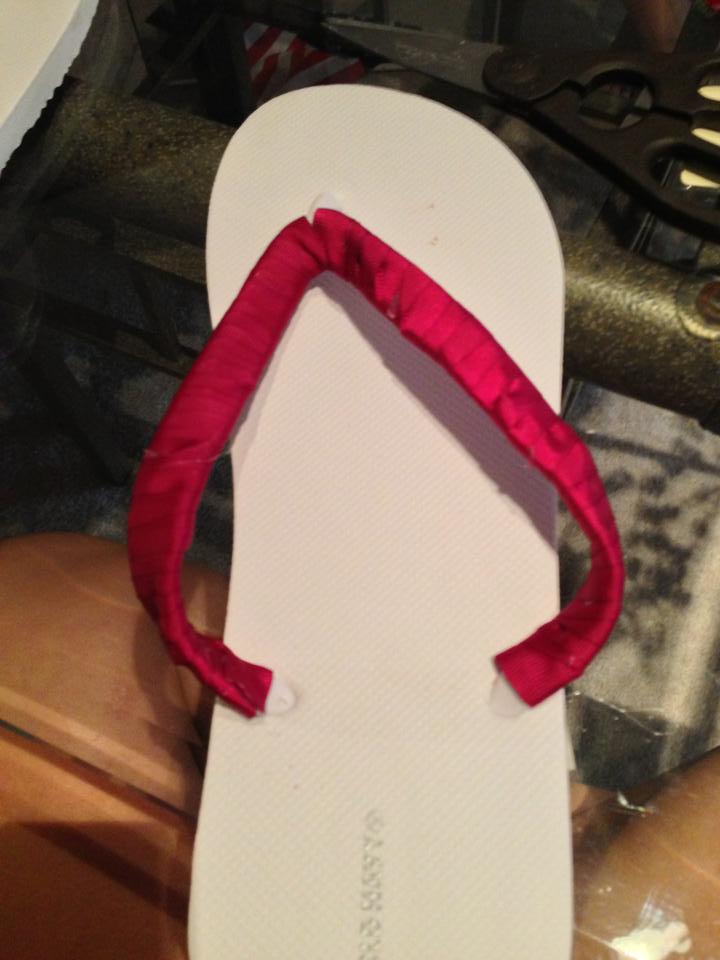
Voila!
Then wrap the other!
Dos!
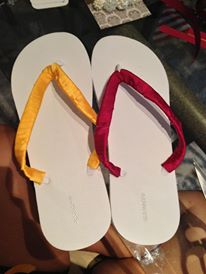
I wrapped the top of the thong with the opposite color. This is GREAT for sports teams. Most boys aren’t going to wear ribbon flip flops, but if they did this is how they’d do it.

Those are some MAN feet!
Now let’s do some lady shoes!
Start with a pair of flip flops. Obvi.
I feel an elephant ear costume is in the works.
Wrap the flip flops in ribbon, much like the first pair.
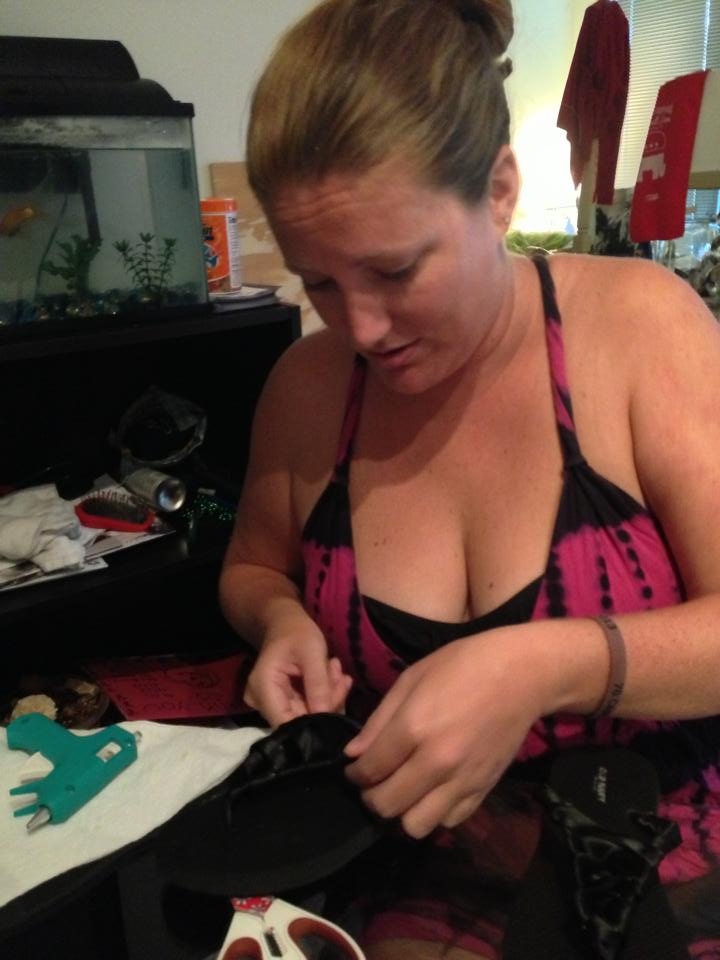
Such concentration!
And watch this video as Whitney crosses the ribbon between the two straps to make a bed of ribbon for some bling.
We had a video of me demonstrating how to bling out your flips flips after the ribbon bed is created. Unfortunately, that video is on Whit’s phone and she can no longer find it. Suffice it to say that there was a LOT of hot-gluing of beads onto the ribbon.
And the finished product! These are fairly simple, too. However, I would recommend stitching each bead on if you can/have the time. This pair is falling apart (all the little pearls and jewels are falling off) and it’s only been about 2 weeks. All the other pairs are holding on just fine.

These flips are no flop. Hardy har har.
Now for our last pair!
For this pair, we took fabric and folded it over itself to make an inch long strip.
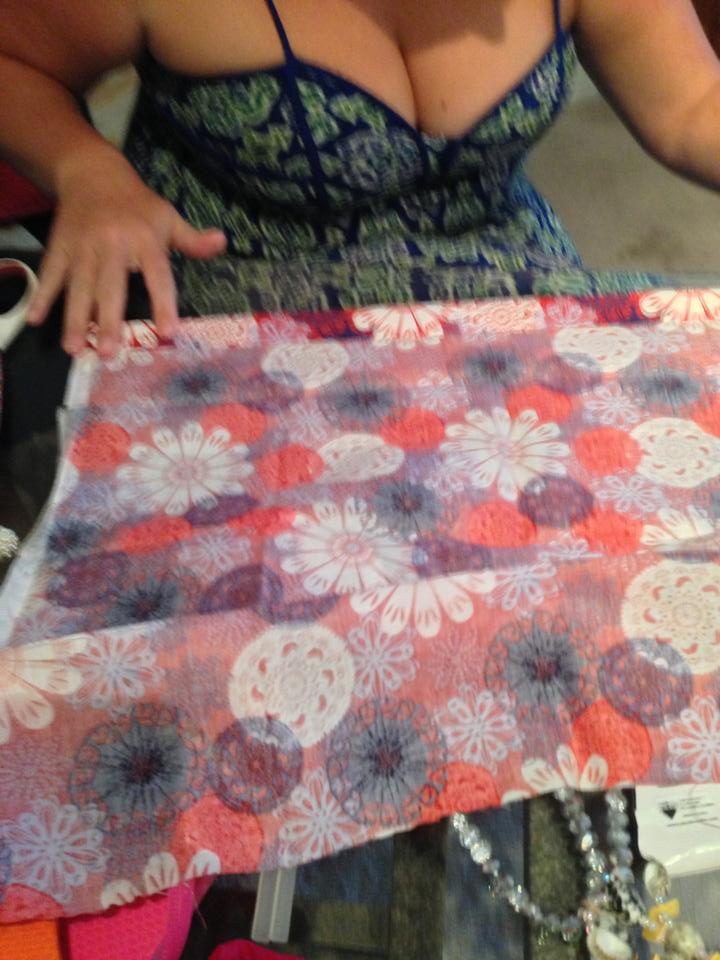
Also, get a friend like Whit who gets hella OCD about straight lines.
Then we “hemmed” the fabric with hot glue. We only glued about 4 inches at a time to ensure that the fabric would stick best. Then we cut the strip away from the rest of the fabric.

With more flip flops in the background.
After, we wrapped the flip flops with the strip of fabric. When gluing for this, make a loop around the base of the flip flop with the fabric and glue the fabric together. As you wrap the flip flop, continuously overlap the fabric and glue the overlapping pieces.
For the next part, we sewed on a little bling. Here is the finished project!
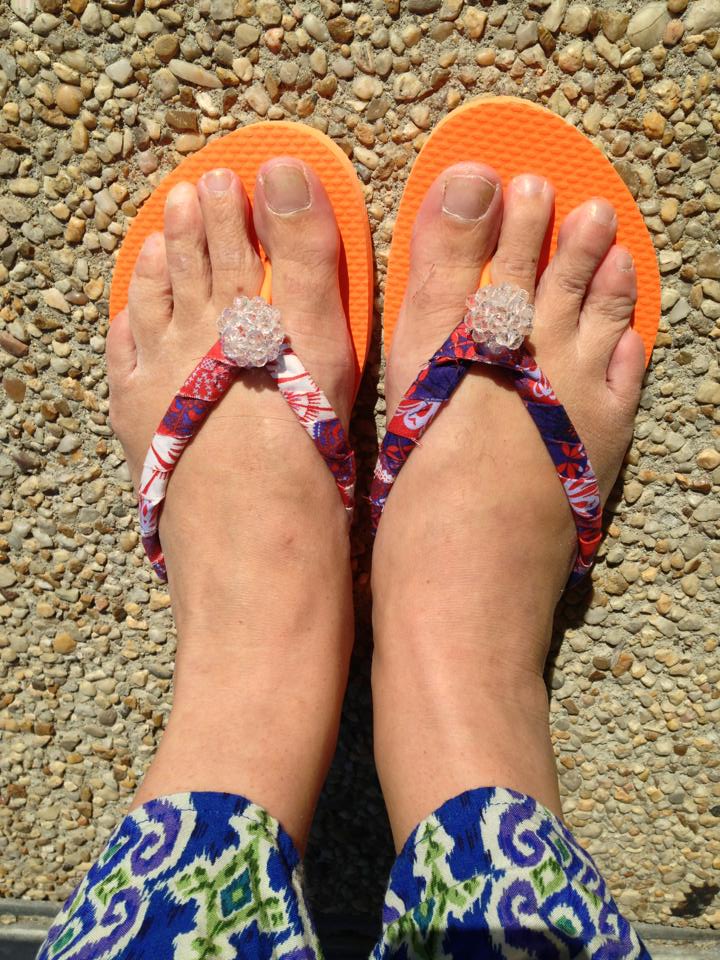
Gorgeous!
Did you like these flip flops? Do you want your own pair? Send us a pic of your flip-flops with your feet like the picture below to flipflopsandfreedom@gmail.com and we’ll enter you into our contest to win this lovely pair.

We’ll also be using pictures of flip-flops in our new re-design, so look for your little feetsies soon!
LG and I have lived in DC for four and three years, respectively. That’s a fairly significant chunk of time. Despite that, we are occasionally AMAZED by some of the extremely strange trends and habits that we run into out here. So once a month we have decided to bring you a “WTF DC” post, where we talk about things we have found here inside the Beltway that totally confuse us. Let’s kick it off with critter pants.
There is no question that different parts of the country have their own distinct style. Some things are adorable and some are, well, perplexing – I’m looking at you, Nantucket Reds. DC is a strange hybrid of East Coast and Southern style, so there are many interesting sartorial displays to be found but by FAR the weirdest to us is the critter pant.
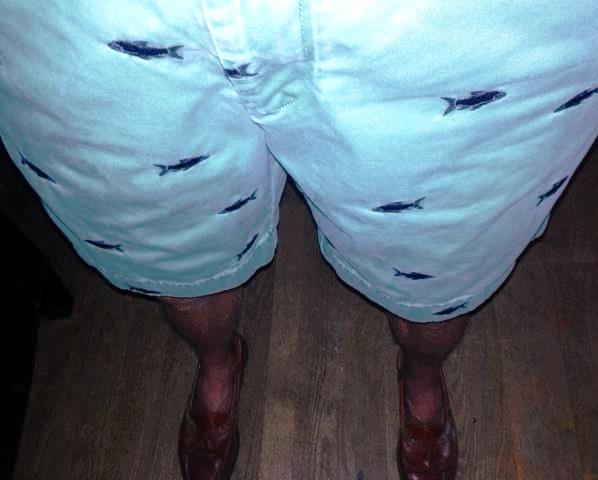
Where are they swimming to? What are they swimming away from?
Let me explain the standard critter pants:
1) Take a perfectly normal pair of pants.
2) Dye them a bright, obnoxious color.
3) Cover them with any random animal.
4) Throw on a belt with an equally random pattern (no need to match it to the shorts).
5) Add a button up and boat shoes and walk out into the world like what you are wearing is normal.
And finally
6) Don’t just stop at pants! Washingtonians feel free to do this with what ever they might want to wear – dresses, shorts, flip flops, belts, ties, sunglasses. THE MADNESS WILL NOT END!
I want to meet the guy who said, “I should put swordfish on some shorts.”
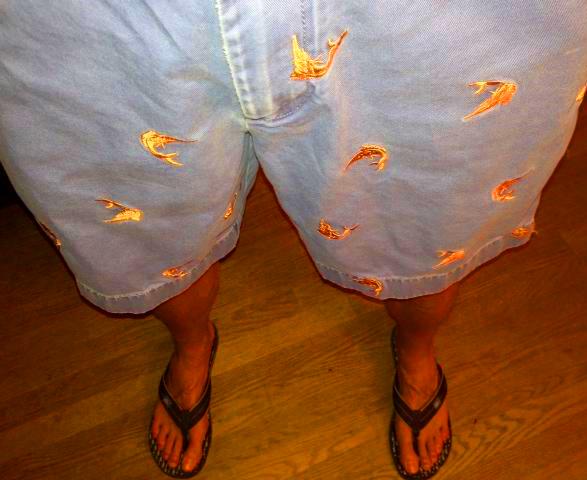
Our friend KC sent us a few examples from his own critter pant collection, to demonstrate for our California readers who have no earthly idea what we are talking about. We love KC and he is a perfect Southern Gentleman but DEAR LORD does he own a lot of critter pants.
The most confusing thing about critter pants is that they seem to be acceptable casual/beach wear. This is where we must take our stand. How is this even remotely acceptable??? Everyone knows that appropriate casual wear is some board shorts, Rainbows and a tank top! Where, oh where, did DC go so wildly astray? I am now on a mission to civilize (or decivilize, as it may be) all our male friends and get them into some appropriate board shorts, even if it’s the last thing I do in this town. Bonus points if I can get them to embrace suns out, guns out.
Of course, even the righteous can occasionally succumb to the Dark Side.

Sellout.
Oh LG. Sigh.
I love being a Californian in DC. But I hate being a Californian who has to travel back and forth between DC and home. It’s a long, annoying flight and I frequently find myself stuck on a red eye with a screaming baby. This makes for a sleep-deprived and cranky Whit.
Luckily, I have LG to take care of me. When I returned to DC after a trip home last weekend, it had been an entire week (gasp!) since I had seen her. I was in dire need of three things: LG-time, food and sleep. And carb-free LG (I love rhyming) was looking to take her new-found love of cauliflower for a ride and make a cauliflower crust pizza.

Cauliflower boobies – as uneven as real boobies.
The recipe for the cauliflower crust, which LG found here, was pretty easy. You will need 2 cups of grated cauliflower, 2 tbsp of parmesan cheese, 1 cup of mozzerella cheese and 1 egg. We doubled all of the ingredients for our batch. We like leftovers.

The greatest grater.
After you break the cauliflower down into chunks, you will need to grate the florets into smaller crumbles. I was strictly an observer but LG noted that it was extremely easy to grate up. When you’re through, it will resemble chunks of feta cheese. Mmmmm, cheese.

Cheese? Not Cheese? Ahhhh, so confused!!!
LG measured out 4 cups of cauliflower, put it in some cheesecloth to help it dry out and then microwaved it for 8 minutes to soften it up. Then she added in 4 tbsp of parmesan cheese and 2 cups of mozzarella (if you’re doing one batch use 2 tbsp of parmesan and 1 cup of mozzarella). We may have eyeballed the cheese measurement. A little extra won’t hurt anything.

Egg boobies are smaller than cauliflower boobies.
Then LG stirred in 2 eggs. Finally, for her own twist on the recipe, she added in a few shakes of Italian seasoning. I was an extremely helpful taste-tester and then added a couple more shakes. Then she spread the whole mixture evenly over a pizza pan, sprayed it lightly with some cooking spray and stuck in in the oven.

Seriously, it looks just like real dough. That’s my story and I’m sticking to it.
While the crust cooked, LG whipped up some homemade tomato sauce. I’m not going to lie, I wasn’t totally paying attention here, but I think it involved 3 cans of crushed tomatoes thrown into a Vitamixer, then a can of tomato paste added in, and then it was all stirred together and heated up on the stove.

LG loves her (kitchen) toys.
Once the crust was done baking, we pulled it out of the oven to add on all of our toppings. It was a really nice golden brown and smelled AWESOME. We probably could have eaten it right then and there.

Get in my belly.
All that was left to do was add the toppings! We dolloped on the tomato sauce, sprinkled on a bunch of cheese, threw on some fresh basil from LG’s new plant, tossed on the turkey pepperoni that we hadn’t already eaten and finally added on some chopped mushrooms.

Clearly an artiste.
Once the pizza came out of the oven, we dove right in. This might have been our only mistake. The cauliflower crust needs a little time to cool and harden or it crumbles up a bit too easily. However, a slightly crumbled crust did not stop it from tasting AMAZING. And it was shockingly filling. I’m usually in for at least 3 pieces of pizza but I was good and full after only 2!

Might have forgotten to take a final picture in our hurry to eat it. Leftover picture will have to suffice.
It really was an amazingly easy recipe to make and it was exceptionally delicious. I’m not as carb-averse as LG but if all of her recipes taste as good as this one does, she may drag me over to the dark side. And after I got my LG-time and my food, I promptly fell asleep on the couch. Best way ever to recover from a trip home.
LG here! Now that we’ve all fallen in love with cauliflower, let’s have Round II. Cauliflower mash is such a delicious alternative to mashed potatoes. I never thought I could replace mashed potatoes, but boy was I wrong. This recipe is SO easy: a cauliflower, have a packet of cream cheese, butter, and a fork. The fork is for eating the cauliflower mash. I highly recommend using it.
First, wash your cauliflower! Always wash your veggies, and your hands.

Yes, I took a picture of washing cauliflower.
Now, boil some water. Once the water is boiling, throw in the cauliflower. Don’t be like me, though–put it in gently. I may have burned myself. After about 10 minutes take out a piece and see if it crumbles easily. If it does, throw everything back in that strainer.

That weird looking stuff is veggie “meat.” Yes, we go far and beyond just carb free. We’re straight up freaks!
Put the cauliflower back in the pot and get to mashing!

Love Big Sug, but this is def a blurry picture. Apropos?
Now, add in the cream cheese. I’d recommend adding it in slowly. It will make everything more consistent. I, however, do not have that kind of patience.

ALL THE CREAM CHEESE!!!
You are so close. Mash and mash and mash some more! Once it has a steady consistency, throw the butter in there. Mash some more while it melts.

I think this picture beautifully illustrates our height difference.
Add in whatever you like in your mashed potatoes! Garlic? Absolutely! Salt! Pepper! Graaaaaaaavy!!!

We added veggie gravy to this batch. Delicious!
Then get that fork out! It’s so delicious AND it’s a veggie.
Cauliflower is my new miracle veggie. I am not big on sitting down and just eating a vegetable (I prefer candy), so this recipe was perfect for me. I felt as if I was eating a starch, but really I was getting a HUGE serving of veggies. Trick your kids! Trick your friends! Trick yourself! Cauliflower is so versatile, so take it off that antipasto plate and cook it up real good.
WE ARE CALIFORNIANS!!!
That shout alone should let you know three things about us: 1. Snow is a place, not a weather pattern. 2. Yes, we WOULD rather be at the beach. 3. We L-O-V-E In ‘n’ Out.
Now, In ‘n’ Out is pretty strict about where they’ll build their restaurants. In the foreseeable future, there is just no way we’re getting one within 1000 miles (and we probably wouldn’t drive more than 500 for a burger–but we would def drive 500 miles for an In ‘n’ Out burger if that were an option). Luckily, some crazed chef did a serious breakdown of an animal style double-double. Here is the link. That man is a saint.
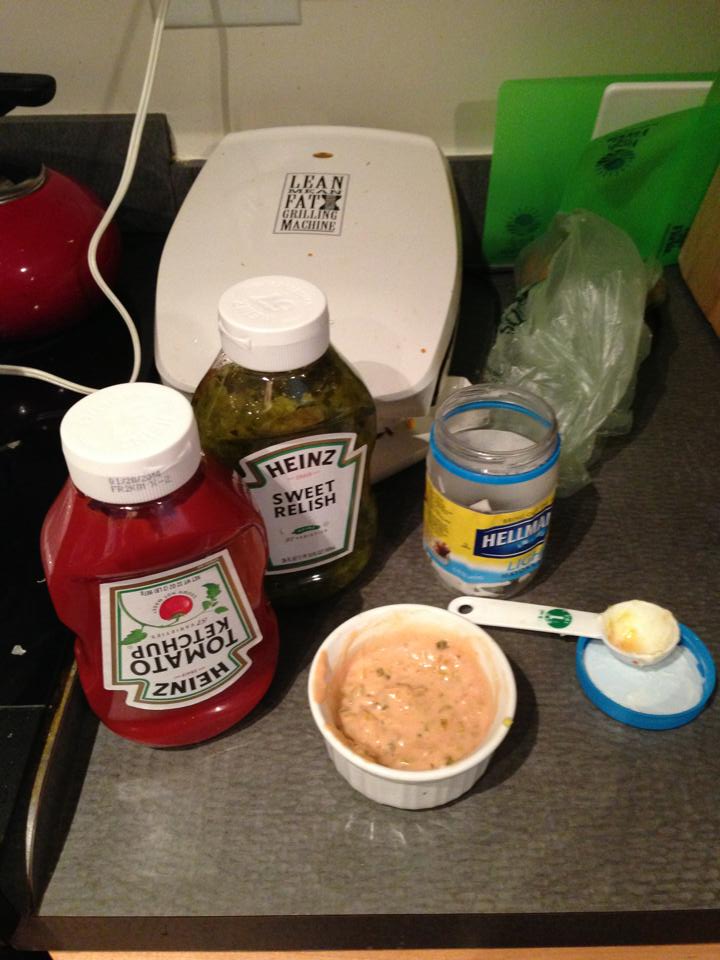
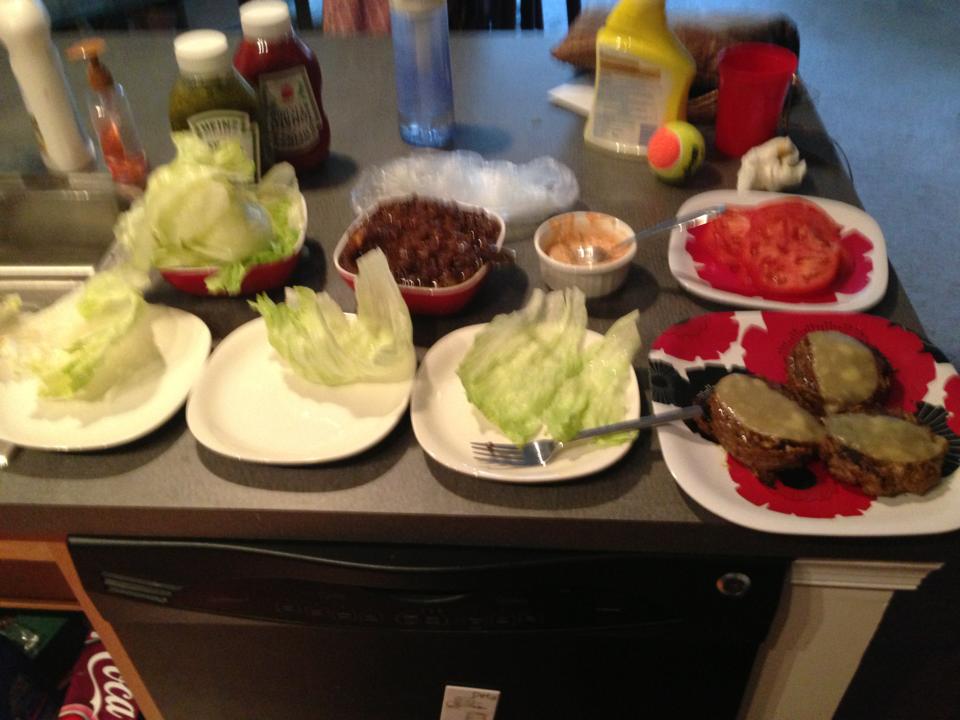
With recipe in hand, we tracked down all the necessary ingredients.

You may notice a lack of buns. Totally on purpose and not ’cause we left them in the car.
What you’re looking at is:
-half pound burger patties (the recipe calls for 2 quarter lb burger patties, but we’re rebels)
-six onions
-a tomato
-a head of lettuce
-mustard
-mayo (for sauce–2 tablespoons)
-sweet relish (for sauce–2 tablespoons)
-ketchup (for sauce–1 tablespoon)
In ‘n’ Out Animal style burgers have a few components that make them different than a regular In ‘n’ Out cheeseburger. The one that really stands out when you take a bite, though, are the caramelized onions. Oh my. Those onions…they are perfection.
Now, the recipe says that the onions take a while to cook. A while? A while is the length of a sitcom. This was forever. It really should say, “the onions will take forever.” But when we want something, we put in the hours. Hours. 3 hours. Not joking. Start the onions EARLY. We thought this would be a lunch meal, but it ended up being dinner, because of these onions. However, let us say two words: WORTH IT!
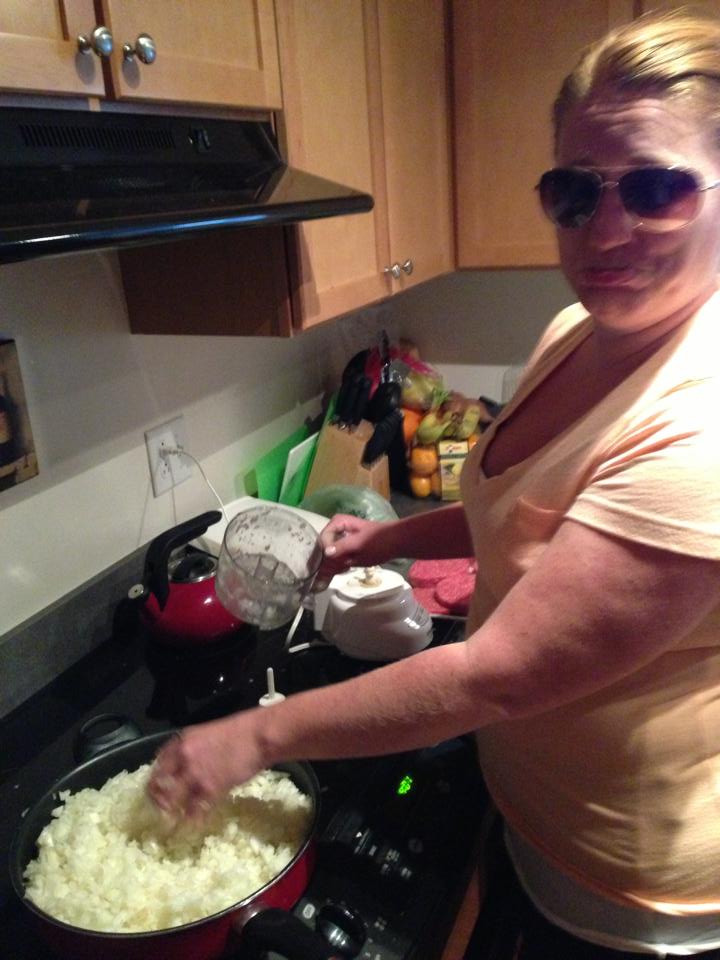
So! Now that you’ve got your six onions in hand, chop ’em up. We stuck ’em in the food processor after chopping. And LG left quite a few on the floor, too.

“Chopping is hard.”-LG
After chopping/food processing the onions stick ’em in a pan with some oil over medium heat (let’s be honest, we started them on high heat and then realized that impatience didn’t make them cook more quickly–it just burned the bottom ones). After about an hour, pour 3/4 cups of water over the onions to “deglaze” the pan. We’re not chefs–that’s just a word the chef used. But it works, so whatever.

Wow. that is a TON of onion.
When the onions FINALLY start turning brown, turn the heat down a bit. Get up from your game of Wii Monopoly about once every hour to deglaze the pan again. You’ll end up doing it 3 times.
No joke. Here is what you’re left with at the end. It’s delicious. It’s fragrant. And it’s about 1/6 of what you started with. This is the bowl we used to move the onions (one at a time) to the pan. They REALLY cook down.

Delicious onion jam.
So, now you have your onion jam. Next step: make your special sauce.

So, this is where we thought the recipe guy got a little nuts. You broke down the exact amount of ketchup, mayo, and sweet relish of the sauce? I bet they don’t even try that hard at the restaurant. However, we thank him, because it’s delicious. The special sauce is easy: take the 2 tablespoons sweet relish, 2 tablespoons mayo, and 1 tablespoon ketchup and mix them. Easy peasy.
“Special sauce is gross.” Whit the weirdo
(possibly captioned by LG)
Now it’s time for burgers!!!
Whit did our burgers (LG is scared of raw meat…unless it’s fish. Weirdo). She added some salt, pepper, and garlic powder to the meat for taste. Then the magic happens: mustard. What? Mustard. Whaaa? Mustard. For real. We’ve more or less decided anything cooked on a pan should be cooked with mustard. What? Mustard. Whaaa? Mustard.
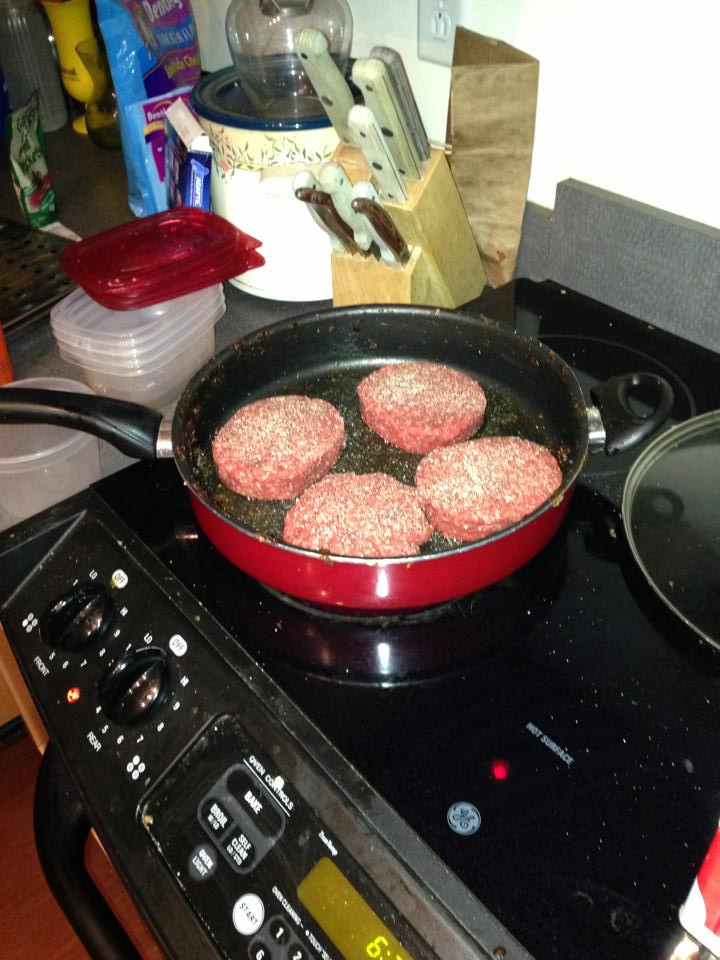
Just some raw meat hanging out in a pan.
SO! After seasoning, we threw the burgers in a skillet. Then mustard was added to the top. THEN we flipped the burger. The smell of that mustard cooking is so good. SOOO GOOD! Then throw some cheese on top and let it melt. Once your burger is cooked through (please make sure your burger is cooked through) it is ready to go!
Assembly line dinner: what it looks like to live with roomies.
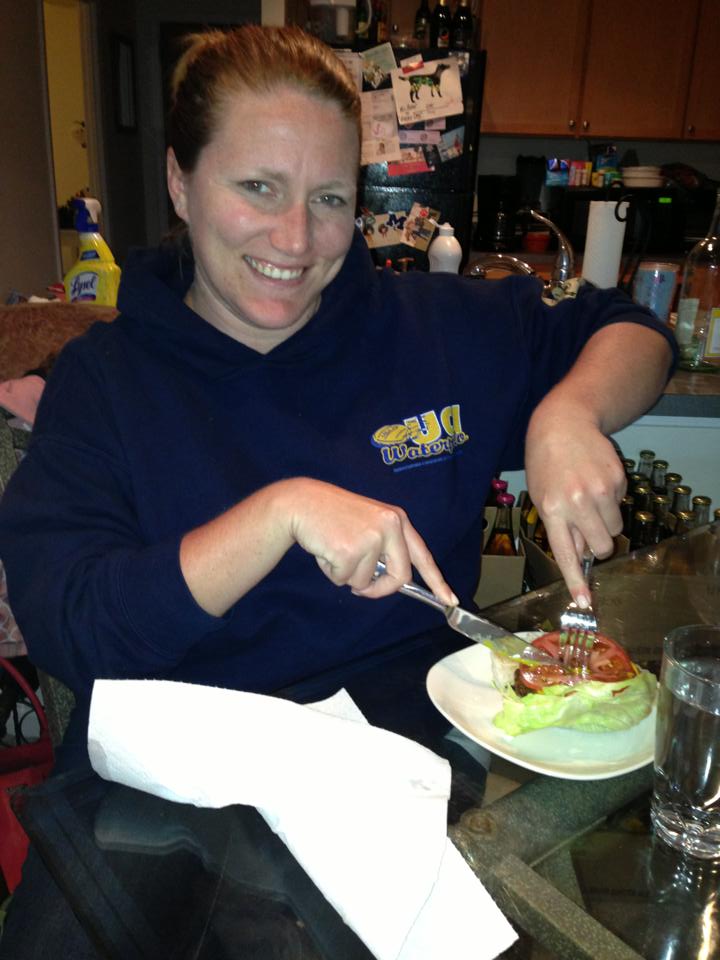
We won’t run down burger assembly–we’re assuming you can assemble a burger. We wrapped them in lettuce ’cause LG-the-weirdo doesn’t eat carbs.
No. Thank god.
The burgers were AMAZING! We made ours with thicker patties instead of two patties, and it worked just fine.
Whit

LG–eager much?
Really, what makes it great are: the onions, cooking the burger with mustard, and the special sauce. We figured it out! And yet, we will definitely still pay for In ‘n’ Out every time we’re back home.
Whit and her protective eye wear. Onions are dangerous, people!
We’re giving this a HELLA INVOLVED rating, because the onions took forever.
